 How to sync ringtones with iTunes
iOS UPDATE : Confirmed working! April 4, 2018
We have confirmed that the latest versions of iTunes and iOS are syncing tones properly again. Our tutorial has been updated to reflect the latest versions of iTunes. We do not recommend using 3rd party software to sync tones at this time.
Note: This tutorial uses screenshots from Mac OSX, but the process is the same for Windows 10.
Update
IMPORTANT: Please update to the latest versions of iTunes and iOS.
Extract
Download the zip file you got from RCP (emailed from our app or downloaded from our checkout page) and drag the folder of ringtones out of the zip to your desktop (or another safe place on your computer).
Set iTunes to ‘Manually manage music and videos’
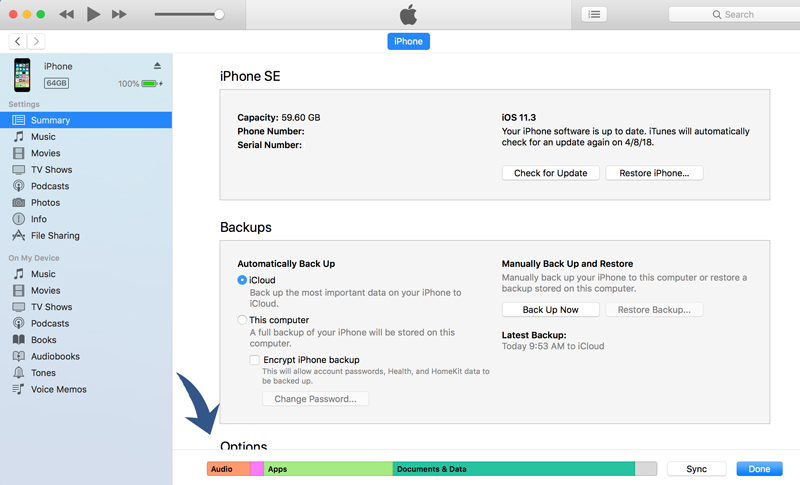
Open the latest version of iTunes, connect your iPhone to your computer, and click the small iPhone icon near the top bar of iTunes. This will bring you to the iPhone Summary page. Scroll down this page to the Options section.

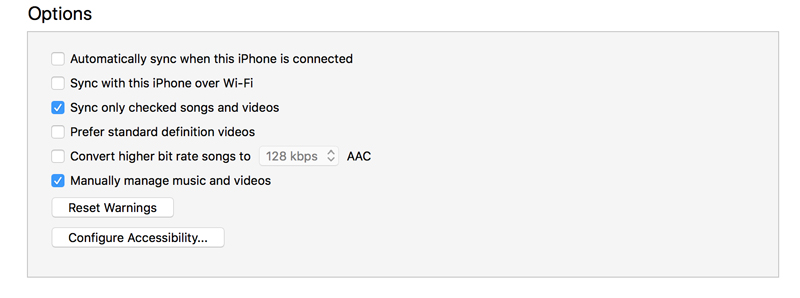
Make sure “Manually manage music and videos” is checked ON. Then click Apply.
 You may receive a message telling you to backup and sync your iPhone. This will be necessary before continuing.
Move the tones to iTunes
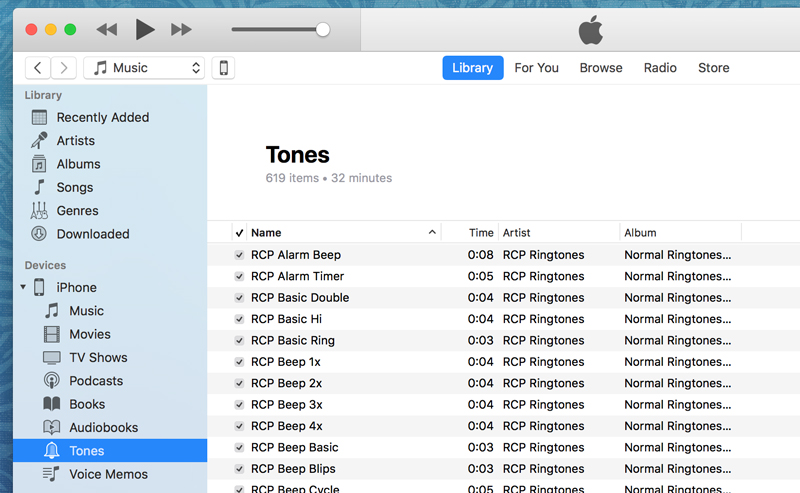
Navigate back to the Music section of iTunes, open the folder of tones, select them all (Cmd + A), and drag them directly to your iPhone listed under Devices in the sidebar. You should see iTunes begin syncing the tones to your iPhone.

Check your iPhone
When the tone syncing process completes, your Tones section of iTunes should look like this.

On your iPhone, open the Settings app and navigate to Sounds (you may need to restart the Settings app, or in some cases restart your iPhone). Here you can assign your Ringtone, Text Tone, and other alerts. To assign custom ringtones to different contacts, use the Contacts app.
Troubleshooting
If you receive a message that says “Are you sure you want to remove existing music, movies, TV shows, books, and tones from this iPhone…” you will need to backup your iPhone to this computer and then sync your iPhone
If some of the tones are not transferring to the phone (grayed out in iTunes), switch over to the iPhone section of iTunes, and click Sync.
Sometimes the tones just won’t sync over to the iPhone. We don’t know exactly why this happens but we think it has to do with some buggy iTunes caching issues. The best solution is to delete all the tones from your library (in iTunes go to your iPhone > Tones > Select all the tones > right-click and ‘Delete from Library’) Sync Tones, sync your iPhone, then recheck Sync Tones, and sync again. Try restarting your iPhone as well to reset the cache, then rinse and repeat.
We’ve also had more success syncing less than 100 tones at one time. If we try to sync 500 tones at once, many end up being grayed out and not syncing over. This requires us to ‘Delete from Library’ and try again, syncing around 100 tones at a time instead.
For other problems, please contact our support team. We will get the issue sorted as soon as possible.


 How to sync ringtones with iTunes
 You may receive a message telling you to backup and sync your iPhone. This will be necessary before continuing.

